Category Archives: Project - Page 6

Flask seems a good fit

I was looking for a better way to do my Network Server commands, so I headed over to the Python IRC channel and asked for some better ways to send text across the network.  After some chatting back and forth someone mentioned HTTP and REST, so I started my research.  It didn’t take long to find Django (what I used before) and Flask (I saw before, but haven’t used).  So I looked around trying to see what the purpose and differences of the 2 are.  It was obvious pretty quickly that Flask was the one.  My commands and data are pretty basic, so having a micro framework to send and receive made sense.  There also seems to be a lot of module attachments to enhance Flask, so future expansion is there.  

I have now replaced my basic sockets server with Flask.  I have to admit, there’s a lot to like.  For one, I can just go to the URL of the sensor in a web browser to view results!  Soo very helpful during testing to see if anything looks off.  This also opens up possible phone apps that just use a wrapper around a web browser.  It would be pretty sweet to use my phone to interact with sensors.  

Definitely a few more possibilities in the near future.  I still have to rework some of my unit tests and actually test the program a bit more, since I just overhauled the network service, but so far it’s looking pretty good.  

Lots to do, so back to it I go. 

Update system & notes!

I have been working on a few things as of late.  For one, notes can be saved into the sensor Database at whatever time you choose.  This is meant to aid in putting notes beside the actual sensor data.  I’ll be adding the notes into the graphs later, so that they will show up with the graphed sensor data, using the time you enter!  AKA, you notice the sensor malfunctioning at a certain time, you enter a note with the same or close Date & Time saying “Malfunction, ignore this” or “Very important data represents time travel”.  Whatever helps identify what the data represents.  It can also be used to bookmark or tag certain times with things, like manual settings for temperature offset or other important information not being captured by the sensors, etc.  Later on, I’ll try to get it so you can “Graph by notes”, and it will graph say, 1 hour on either side of every note’s time frame, making it easy to instantly populate graphs with important data without having to search every time. I’ll be giving it more thought for sure. 

Since I seem to like ordering my options in the config and sensor files, in a way that’s not great for compatibility (AKA I don’t add every new option to the bottom, I reorder the whole list).  This is a pain, as I manually have to log in through SSH and re-adjust the sensor configuration files for the new options.  So I had a few ideas on solving it. 
1) Add the ability to change installed sensors from the control center
and or
2) Create some updated functionality to automatically make needed changes after the upgrade. 
I went with the 2nd option first and made an upgrade module that adjusts any needed files and related settings, then re-saves them.  It also uses the versioning system, so it can incrementally update from this version onwards, even if you miss a few versions along the way!  This will make my future upgrade tests go a bit smoother!

My other major upgrade was to the environmental temperature adjustments.  Before it was a manually set option in the graph window, but this makes it annoying to swap between different sensors with different offset needs.  So I moved the offset into the sensor itself and created different offsets for different setup combinations.  This way it’s all automatically set by how you set your installed sensors configuration file!  AKA it will give recommended offsets depending on what hardware is being used.  So now you can check a “Use Default” temperature offset checkbox, and the graphs will use the offset provided by the sensor.  A custom offset is also available in the sensor configuration file, in case a sensor doesn’t follow standards.  And of course you can uncheck the use default and set your own setting during graphs.  Whatever is set on the sensor, will also be saved into the SQL database when the environmental temperature readings are saved.  

Those are the 3 main things I have been working on.  

I think I’ll re-work my re-configuration of the sensors.  I think I can make a decent live update by pulling and pushing the text files into and out of a textbox, similar to my Log viewer and Notes window.  If I do that, I think the program can do everything remotely!  Between the log viewer, update module and soon to be installed sensors and config adjuster, keeping my demo and test sensors running smoothly through upgrades is starting to sound like an easier task 🙂

SenseHAT Ehancements + Updates

If you are lucky enough to have a SenseHAT with your Raspberry Pi, I have updated the sensor software to allow the use of its JoyStick and LED grid! The following commands are

  • Up = Scroll IP address on the LED grid
  • Down = Display “Steve” on the LED grid OR Confirms Shutdown
  • Left = Scroll humidity
  • Right = Scroll Temperature
  • Push = Initiate Shutdown (Requires confirmation of Down JoyStick)

Due to the extra additions on the SenseHAT, it is a nice sensor to start with for trying things out, since you can just plug in power and be able to see readings right on the LED grid AND have it shut down with the button combo.  Other sensors you have to shutdown remotely with the Control Center or login directly and shut down, and of course, no other currently supported sensor has a display. 

I now have a working Gnu/Linux installer working for both SMB and HTTP, but customizing a file is required if you want the desktop shortcuts on a different user than pi (Menu shortcuts work just fine). 

In other news, a few new battery backup systems have come in for me to try out.  This time I decided to go with something a bit more expensive to help with the solar deployments.  To that end, I grabbed a “Goal Zero Yeti 150” and a “Goal Zero Sherpa 50”.  They both have hookups for solar panels and are pretty hefty.  I put a RP Zero + Garden HAT on the bigger 150 to see how long it lasts.  I’m going to put the smaller one outside with a solar panel and see how that goes.  Both units oddly enough cost me about $250 each.  If they work as fully self-sustaining units, they are worth the price.  O yeah, the manual for the Yeti was pretty useful! It says to help with using the battery in colder temperatures, put it in a cooler, as the ambient temperature it puts off would keep it warm enough inside the insulated container.  A very good idea, since it will be in the outdoors during winter and I have been thinking of ways to protect the battery units from the elements.  I look forward to testing results, but I suspect I’m going to have trouble keeping the snow off the solar panels … I might have to be a bit more creative for that.  

That’s it for tonight.  

Version 21.18 Released!

New Version out!  I was going to get pipenv working before release… but it looks like that’s going to take a bit more time.  
Here are a few highlights of this release.

  • Allow Live Graph on 3 point data
  • Merged Sensor SQL Interval & Trigger code & databases
  • Created Log viewer and downloader in Control Center
  • Tweaked System Report and added Installed Sensors to Config Report
  • Raspbian desktop and menu shortcuts added
  • Created uninstaller for sensors
  • Changed locations for sensor programs, configuration and data to be more in line with Gnu/Linux file structuring
  • Updated help files
  • Bug fixes and code optimization

Due to the location and database structure changes, this version is not compatible with older versions.  I recommend doing a clean install if you have  a previous version installed. 

New Sensors!

So, I'm rather excited to say that pimoroni.com has released a new attachment board called the "Breakout Garden".  It lets you hook up to 6 sensors at a time, without the need to solder! And you can swap them around all you like.  I especially like the fact it makes the sensors stick up, so the heat from the Pi itself should affect it much less, if at all!  

I might of gone overboard a little bit… not going to say how much I spent, but I will say I have a good set of 4 fully loaded sensor boards on the way.  I'm pretty sure Pimoroni was the one that had really good Python libraries, so I'm looking forward to working with them, and probably making them my primary sensor boards.  Because of the modular nature of the board itself, and I'm working with soo many different sensors, I need to make the programs modular, so it can install and be used with different kinds of sensors…. Its a bit of a undertaking, so I'm going to think about how to implement that for awhile.  

In other news, I have some decently working installers for my PC Sensor Control Center application.  Everything appears to be working well, right after install. 

I added a Configuration window to load, set and change multiple settings, such as timezone offset, Temperature Offset, SQL Querries to skip in graping, default date selections, etc. I have also made all program and file location settings compatible with any OS (I'm pretty sure…).  If the config file is missing, it creates one with default entries, so if anything messes up in it, just delete config.txt in the main app directory, and load the program again for a fresh new copy.  You can also reset it from the Configuration window.   

As you can see in the picture, I have added the GPL ver. 3 to the program.  I also had some people recommend some well documented python code to try and emulate for commenting / documenting my own code.  I'll be working on that to make the code easier to modify.  The air quality in my town is litterally off the Canadian air quality scale, and I'm finding it harder to concentrate in general, so I might put this off for a bit.


Picture of my Sensors

I just realized, I have not actually posted a picture of my physical sensor units yet!  I started with the Raspberry Pi 3B+ and a SenseHAT, but changed to the Raspberry Pi Zero W with a Enviro pHAT later on, due to cost, power usage and expandability.  The bigger one is the Pi + SenseHAT, the mini's are the Pi zero + Enviro pHAT. 

The Raspberry Pi 3B+ with the SenseHAT was a lot easier to deal with, since I didn't have to solder anything, just push it into the pin.  

The Raspberry Pi Zero w on the other hand, I had to not only solder the 40 Pins on the Pi (for about 6 of them, after which I found pre-soldered ones), I also had to solder the connections on the Enviro pHAT.  So 80 solder points later per sensor and they are good to go … well physically any way.  This was my first go at soldering, and thanks to a video on the Raspberry Pi's website, it went fairly well (and by that, I mean they all worked).  

So there you go, those are my physically made sensors that my program connects to over the WiFi network.  

Program License – GPL

I mentioned before that I would post my code, which I will indeed post, but the more I thought on it, the more I realized I should probably choose a license model for the program now, before actually posting any code. 

To this end, I have decided on the GNU GPL Version 3.  I am 100% for sharing and making sure it stays free for anyone who thinks its useful and wants to use it.  If it ends up being used by a company with money, I would sure appreciate funds to continue development and get a few research stations going.  I'm also very much open to adding pretty much any sensor to the units, if you send me a few for testing. 

I'm going to work on the Installer and install scripts for the next few days, so that people can easily get this up and running to try out.  Of course the hardware is still needed to be effective, but I'll be sure to include a section in the Help Menu of the PC program, that will help you make your own sensor unit. Ultimately I would like to give people the ability to digitize the world around them easily, to find out all kinds of Cool stuff.  You never know what you'll find after visualizing the data in different ways.  

I'm thinking I might have something usable by the beginning of September, 2018.  That doesn't mean bug free or pretty, but it will be usable! 

I have already spent a bit of time on the PC installer.  I have been updating my hard coded locations in the program to system variables, so it can be installed and run from any windows computer (Will have to double check if the system locations work in Linux too).  It has just passed being usable on a different computer after running the installer.  The installer puts a folder of Python 3.7 in the app directory and the shortcuts link directly to it, running the script.  The sensor installers are already working fairly well, but I would like to customize it to ask for certain variables upon running it, so its a one stop shop to configure and install.  

I'll post the update log in a later post.  

Enhancements / Plans / ChangeLog

Since I do lots of testing on the fly with multiple sensors, I thought it was about time to add some functionality to the program around sensor control.  

Up until now, I have used SSH for 90% of my sensor interaction, but there is really only 2 things I do a lot of… Update the programs and reboot the sensor.  So to that end, I have added a "Sensor Commands" section to allow just that and more.  Essentially, you check the sensor('s) you want to do something with in the main window, than click a command button like upgrade, reboot or shutdown.  It will send the command to all selected sensors.  

I added a SMB update (Windows shares) and a Online HTTP update (allows upgrading remote sensors with internet access).  I added a checkbox for the shutdown, so I don't accidently click it during quick testing.

I have also created a Windows Installer for the program, which includes a install of python 3.7 with the required libraries.  I originally just created a single .exe using pyinstaller, but Plotly didn't seem to like working with it, so I thought the next best thing was to just make the install easy.  It also runs much faster this way!  

Some of the things I hope to add in the near future include.

  • Put phpSysInfo on Sensors, using lighttpd server for system diagnostic Information
  • Update output files to local user desktop
  • Improve Graph outputs and Options at generation
  • Have update script terminate programs at the end, so the updated versions can start with improved crontab autostart
  • Improve Install scripts for ease of use
    • Ask and auto set Hostname, IP, Wifi, etc
  • Have program write config to file, and load it on boot to Include
    • IP List for Sensors
    • Default Date ranges in Graphs

I spent some time going over the back end code, and thought it best to merge a few things.  So here's yet another changelog.

ChangeLog Aug 15th, 2018

  • Merged 2 .py programs into one for socket communication
    • Merged the live sensor data send with general socket commands
  • Improved logging
  • Added Time corrections to Motion Graph (timezone)
  • added Sensor command "Terminate Sensor Programs"
  • Changed Auto Start method from rc.local to crontab scripts.  
    • Auto runs script every 1 min
    • The script checks to see if the program is running
      • If not running, start it
      • If running, do nothing
      • Allows crash recovery and applying remote updates without restarting the unit
  • Updated E-Ink Controller with Static IP 
    • Updated E-Ink & Sensor update scripts to match new IP
  • Updated Motion Database to save IP for better graph Sensor Identification 
  • (35% done) Started creating a Database "Splitter / Merger / Updater" program to allow
    • Modifications of old databases to newer models or merging with additional fields 
    • Split databases for Later analysis or archiving (X timeframe is in Y location, take just that timeframe and store in new database for later access). 
  • Updated 'Update scripts' 
    • Improved Speed (less network copies)

Using Python3 to collect and manipulate SenseHAT Sensor data

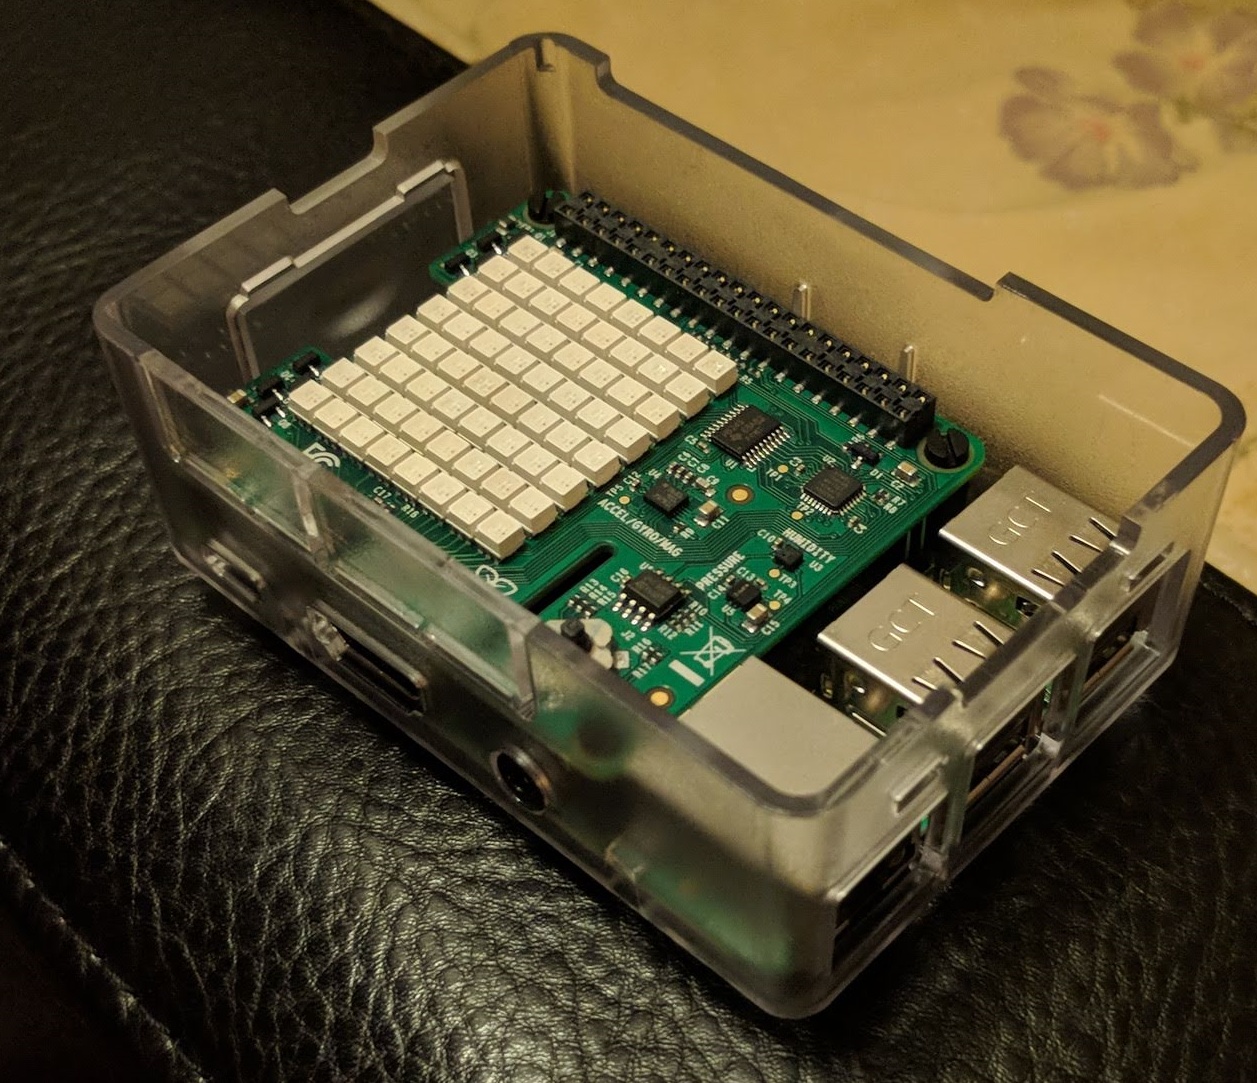
So, as I said in my last post, I want to digitize the world around me, starting with the sensors on my Raspberry Pi 3B+ and SenseHAT attachment.  

After much thinking, writing down ideas and generally trying things out, I finally got things working the way I wanted for the most part.  Here's what I have so far.

1.  Sensor Units: These are the Pi's with the SenseHAT and have the following programs running to enable the features I want (Only the HTTP server is not done by me, I just installed one). 

  • Sensor Readings to File: A simple program that reads "all" the sensors and writes the results as a string, each value separated by a ",". It creates one line each time its run.  It auto runs every 5 min through cron (Linux scheduler).  You could also do something similar with Windows "Task Scheduler".
  • HTTP Server:  The HTTP server just lists and allows downloads of the sensor data files. 
  • SenseHAT Joystick Controls: A small program auto runs with the pi and allows you to use the 5 "button" joystick to run commands and display info on the 8×8 LED grid.  It currently does the following, which helps a great deal when there is nothing attached but the SenseHAT and power.  I also have VNC / SSH enabled on the Pi's to connect remotely.  
    • 1. Display IP
    • 2. Display CPU Temp
    • 3. Display SenseHAT Temp
    • 4. Shutdown
  • Sensor Data over WiFi: Another small program runs automatically and listens on the network for my client app to request data.  

2.  Portable Sensor Data Display and File Downloader:  This is a PI with a 2.7" E-Ink display with 4 buttons.  It simply runs one program on boot to do the following.

  • Show it's own system information, including IP
  • Display Current Sensor Readings
  • Download Sensor Data Files
  • Shutdown

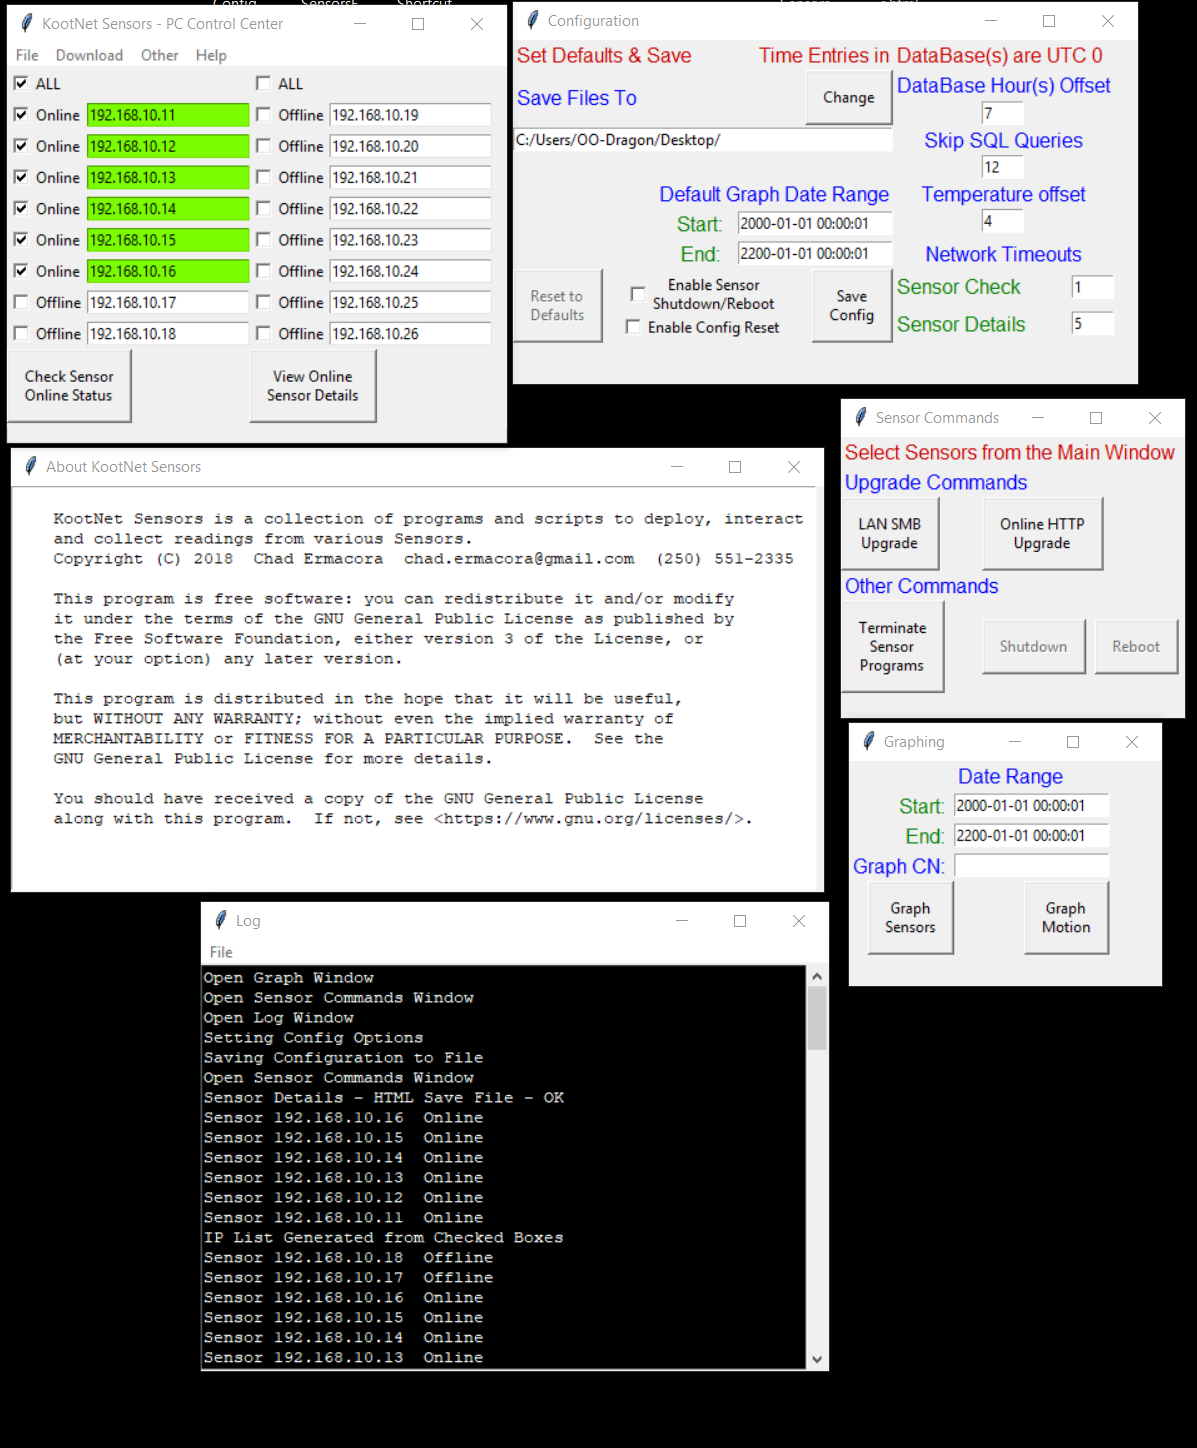
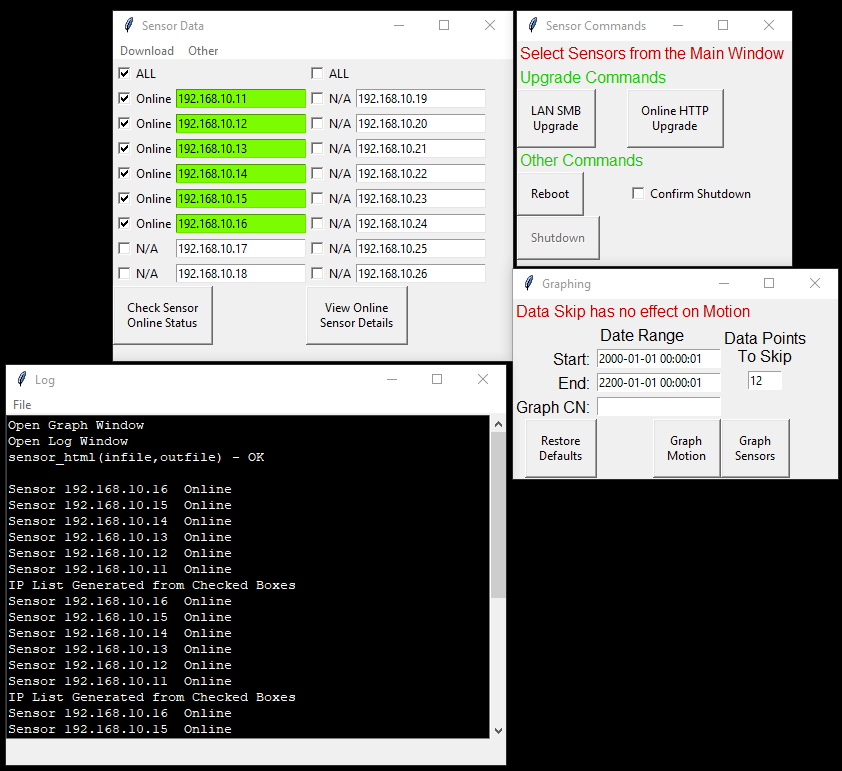
3.  PC: I made a more in depth GUI app for the PC, that can connect remotely to the units to gather information.  It has a lot more options, and is a bit easier to show a picture. 

Its still a work in progress, but as you can see, I can already compare Sensor readings over time.  I can also specify how many entries to skip when graphing the data files, as there should be about 288 entries for a day, after which, the program creates a new file for that day.  Plotting 288 points can not only take a bit of resources, but also isn't needed for most things being looked at. So I set it at 12 by default, so it shows a reading every hour.  

All these separate systems, apps and scripts connect through a mini router I got for $35 that's powered by USB.  This enables me to take the E-Ink pi and the mini router, power them both up off a USB battery Bank and wait about 2 min for the Units to boot and the Sensor Units to auto connect to WiFi, and I can then pull data remotely from the units, up to however far the router's and pi's range are (50-100 meters?).  Great for putting Sensors on tree's, in water, down a hole, etc, etc.  

I also enabled a OpenVPN server on the router itself, allowing me to connect through the internet and grab the sensor data with my PC program.  This can be done, even from remote sites through 3G or 4G connectivity (AKA cell phone service). Simply add a USB dongle for 3G / 4G to the router, and BAM, I can suddenly connect a lot of units, within a decent range to the internet for remote monitoring and maintenance!  

That's pretty much were I am at now.  I'm also working on other aspects like Pi Cases for weather proofing or even water and underwater deployment.  High altitude balloons are also in the future.  

I think that about does it for this post.  I'll eventually post my Python code too, but I wanted to clean it up and add some comments to explain things first (being my first Python project and all). 


A Raspberry Pi 3B+ Python Project!

I now have a use for this domain 🙂  My Python + Raspberry Pi development. 

So, about a month ago, I got a few raspberry pi 3B+ with 2x senseHAT's.  Long story short, the senseHAT is an attachment that is loaded with sensors, a 5 'button' joystick and 8×8 LED grid.  By making your own programs, you can access the hardware and get readings or have the LED's light up in any way you like, including animations.  

The raspberry pi peaked my interest for a few reasons.  

1.  They are pretty cheap at about $50 Canadian.

2.  They are small and power efficient.  AKA I can power them for a long time (few days) off a USB battery bank.  

3.  Decent support to help learn programming.  Check out their website www.raspberrypi.org

However, I was more interested in what kind of environmental data I could digitize through the sensors.  AKA more accurate local weather type information.  Before I could start however, I needed to think of how I could get and store information from the sensors and ways I could manipulate that data to find cool patterns (like when its the coldest time of day, and how and when that changes over days, months, years, etc).  

I have tried a few times to learn programing (C++, Java), but ultimately failed the self taught way, due to a lack of direction to assist with learning (AKA motivation).  But now, for about $150, I can get the pi + senseHAT to do a lot! 

I have actually come pretty far already considering I only got them a month ago, but I'll post about that later.  

This site will be active! 

w00t!