Category Archives: Python

I’m not dead!

It’s been about half a year since my last post, but I’m not dead! I did run into some family and personal issues, so I have taken a lot of time to get some of that sorted out. I’m happy to say I should be getting back to programming soon. I have been doing a bit of programming during that 6 months as well but I kinda forget most of what was done. When I was programming last, I was re-working the networking in Kootnet Sensors so you can adjust multiple adapters for the IP address and also add/edit multiple wireless connections. This way you can have your sensors connect to different available networks. It’s about 1/3 done now as you can already edit all network adapter IP addresses.

I just wanted to do this quick post to let people know I’m still here and plan on doing more work on both Kootnet Sensors and the Raspberry Pi Network Testers.

Sensor Latency Tests Added

I finally got around to adding Sensor Latency testing. A button has been added under the “System Management” page to run it. The latency tests tell you just how long it really takes for a sensor to return a reading. This is required knowledge to set trigger variances in the seconds or less, so it doesn’t end up building a queue of reading requests waiting to get data. I have already set each sensor’s “multiple access wait times” to match more closely with how long it takes to get a sensor reading. This should improve performance when sensors are accessed at the same time.

Most sensors return data within 100ms (0.1 seconds). Some like the EnviroPhat can get a reading from each sensor within 10ms. But there’s one sensor, the light spectrum AS7262 that can take anywhere from 700ms to 8 seconds! I’m not sure exactly why, because my other spectrum sensors, like the BH1745 and the EnviroPhat, can grab readings in less than 20ms every time. I also checked the source code for the driver and how I set-up the API, and it’s set for under 30ms to get a reading for each of the six colours, so added up, it shouldn’t be much more than 200ms, and that’s assuming it can’t do them in parallel.

I have been putting off doing the configuration section under Sensor Control because I know I can actually get it to re-use my existing individual configuration pages without copying them … but it would take some creative re-working, and I have been lacking in creative motivations. Soooo… I think I’ll just copy-paste to get it working and refactor it later.

Kootnet Sensors Runs on Ubuntu

W00t, I made it so Kootnet Sensors can be run on Ubuntu (and probably other GNU/Linux systems). It just disables the hardware access functions but allows the web interface with access to “Sensor Control” to manage other sensors. Most changes were made to where the configurations are saved.

So this is awesome for testing! I can now just get it running from my Development Environment and test most HTML functions. It also does not require root access if there are no sensors.

Besides that, I also moved the sensor in use checks to the driver interface so nothing could bypass the check. The “Online Services” section of Sensor Control now works as well, except for setting the interval.

Things are coming along nicely.

Kootnet Sensors – Hardware Drivers Included

I have put the hardware drivers directly into Kootnet Sensors, instead of installing them with pip. This should ensure all the sensors work, regardless of the upstream project changes or updates I make to utilize new driver features. It took a bit of poking for the EnviroPlus sensor, but it and all other sensors I could test appear to be working well across the Pi Zero W, Pi 3b+ and the Pi4. I’m still wondering about including some of the other dependencies …

A few “bugs” have been fixed, such as making sure only one call to access a sensor is done at a time. Mostly around sensors that require a “keep-alive” thread, which bypassed the other in use checks. This should clear up errors around gas and the EnviroPlus’s particulate matter sensor.
I also made it so sensors that update multiple readings, even with single reading requests use a cache, so if the program is getting readings for all sensors (but through individual sensor reading requests), it can take from the cache for all requests made after the initial update within 1/2 a second.

The next thing I should really finish up is the Sensor Control section of the web portal. Once Configuration and Online Service sections have been done, it can pretty much do everything the PC Control Center app can do.

That’s it for now. Slow going for the short winter days and the long winter nights.

Kootnet Sensors Update

Now that Kootnet Network Testers are working well, I thought it was time to do a bit more on my Sensor Project.

I have started to integrate a version of each hardware sensor driver (the pip modules) into my program directly. The major reason for this, is I have already had 2 sensors change their functions in a way I had to fix my program to use it. This creates real problems because previous sensors don’t auto-update their drivers and conflicts start to arrive where it’s working on one but not another. I’m hoping I won’t have issues between the Pi Zero and the Pi3/4 due to the arm hardware differences. I’ll be sure to test it on all models before release, but so far the only one I am having any real issues with is the Enviro+. All the others have been entirely drop-in replacements. I think I have 4 sensors left to add drivers for, plus the Enviro+ I have to fix.
I’m happy to say that all the drivers so far have added up to about 500 Kbytes. So my installer is currently sitting at 1.5 Mbytes.

This change will also make the install much faster, as pip is not exactly a speed demon for downloading and install modules. I’m also considering adding other dependencies to the installer to make sure it will work, regardless of what happens with the dependencies own projects and even pip itself. But I’m also concerned about security with modules like Flask and the gevent since they are the internet-facing modules that you want to be patched and up to date. For now, I’ll most likely keep Flask and gevent as a pip install at the time of install, however that may change in the future… in fact, I suppose I could include the modules but then add a script to download the new version and copy it over the old one and restart the program… yeah that would probably work. I could even add an auto-update option for those modules at set intervals but disable it by default in case of issues introduced… actually… I can even have it update the module at the time of install.

Anywho, that’s what I’m working on now and once done, should improve consistent stability.

Network Testers Update

I was thinking about documentation when I realized I could integrate the instructions for using it, into the display itself. So to that end, I re-worked the hardware button operations.
With the initial release, each of the 4 hardware buttons was tied to a single command, with the exception of the 3rd button, which if pressed a second time, would initiate an update.
Now I have set the 4th button as a “Change Functions” button, that upon pressing will change the operations of the other 3 buttons, and at the same time, display a message on the screen for what each button does at the current function “level”. The change button currently has 3 levels it cycles through. The new button functions are as follows.
Primary Functions

  1. Run MTR tests
  2. Run iPerf 3 tests
  3. Nothing
  4. Change Button Functions

Secondary Functions

  1. System Information
  2. Standard Upgrade
  3. Development Upgrade
  4. Change Button Functions

Tertiary Functions

  1. Shutdown Remote Test Server
  2. Shutdown Local Unit
  3. Nothing
  4. Change Button Functions

With this change, I can tie more functions to the compatible Raspberry Pi hardware buttons. This should make it a much more useful mobile tool, especially when I start to add other types of tests it can run.

There are a few extra features, such as each instructional page viewed on the WaveShare display, now shows if the remote tester is Online or Offline. This same Online/Offline status is shown on the web portal as well.

The System Information page now shows the following for the ethernet and wifi adapter; Active/Inactive Status, DHCP or Static address setup and the current IP Address.

The about page now also displays the Primary Internet IP address along with the amount of free disk space in GB’s.

I also found and fixed a bug in the WaveShare display. If a button was pressed multiple times before the display finished its refresh, it would crash the display server. I fixed it by adding an “In Use” variable, and if “In Use”, any new commands will be dropped until no longer “In Use”.

I have already put the new update on the standard release channel.
Kootnet Network Testers 1.x.x Series Released

So the new version is out, tested and ready to be used! I should probably work on documentation next but we’ll see what happens.

The new version is now in the Standard release channel. Check it out and start your testing!

Kootnet Testers

I have fixed bugs, added validation checks and tested the testers. I think it’s ready to be released! However, it is 3 AM and I’m fairly tired, so I should probably look it over with rested eyes before actually releasing it.

That being said, it looks to be in good shape. There are proper error messages when the tests fail, the results should always look right on the E-Ink display due to splitting the output into a list instead of picking the exact character locations.

So … I think that’s that, the new release should be out tomorrow sometime.

Almost ready!

Kootnet Network Testers are almost done! That’s the new name I decided on because it’s already in the GitHub name. On Raspbian, TCP/IP 4 can be configured on both the Ethernet and Wireless adapters, as well as the wireless connection settings, such as SSID & passkey. There’s some more testing to do and a few bugs to fix. For one, I was able to test over the wireless network (cool!) but it showed that the MTR readings were getting cut off if more then double digits on the WaveShare display (doh!). The Web interface had no such issues and ran great.

For testing, I set static IP’s on the ethernet adapters of 2 Raspberry Pi’s (a 3 and a 4) and connected the wireless to my network. I used the wireless connections to control the 2 units through the Web Portal after connecting both their ethernet ports to a single ethernet cable. The tests ran great and I have already seen some interesting deviations of speeds, depending on a few factors like what systems are being used, cable and route. It was kinda funny to test my wireless speeds from my office, as they were mostly in the single digits.

Things are on track for an end of the month release. Besides testing and bug fixes, I also have to add a few validation checks for user input around the network configurations. I have a bunch of other ideas, but they’ll have to wait until after the initial release.

Soon!

Ethernet Tester Update

Things are going very well on the Ethernet Tester front. I might have to change the name because technically, the testers can test all kinds of networks, not just Ethernet, especially since it can install on Ubuntu, but I’ll think about that later.

So to start, I’ll list what works. For hardware, the WaveShare 2.7″ E-Ink (both versions) works well, same for the Installer Script. Some of the HTTP sections still need work, but most are operational.

  • HTTP Portal
    • Working
      • MTR / iPerf 3 Tests (Run & View)
      • Primary Configuration
      • Hardware Configuration
      • Online Upgrades
      • Power Commands (Restart + Shutdown)
    • Not Working
      • Ethernet & Wireless Configurations

The Testers automatically save every test run into text files on the computer itself, under the test_results folder in the program’s install folder (/opt/kootnet-something-or-other directory). Each text file also has half an epoch timestamp at the end, so you can figure out which was the most recent run. I’ll later be adding a section in the HTTP portal to review past results in the near future.

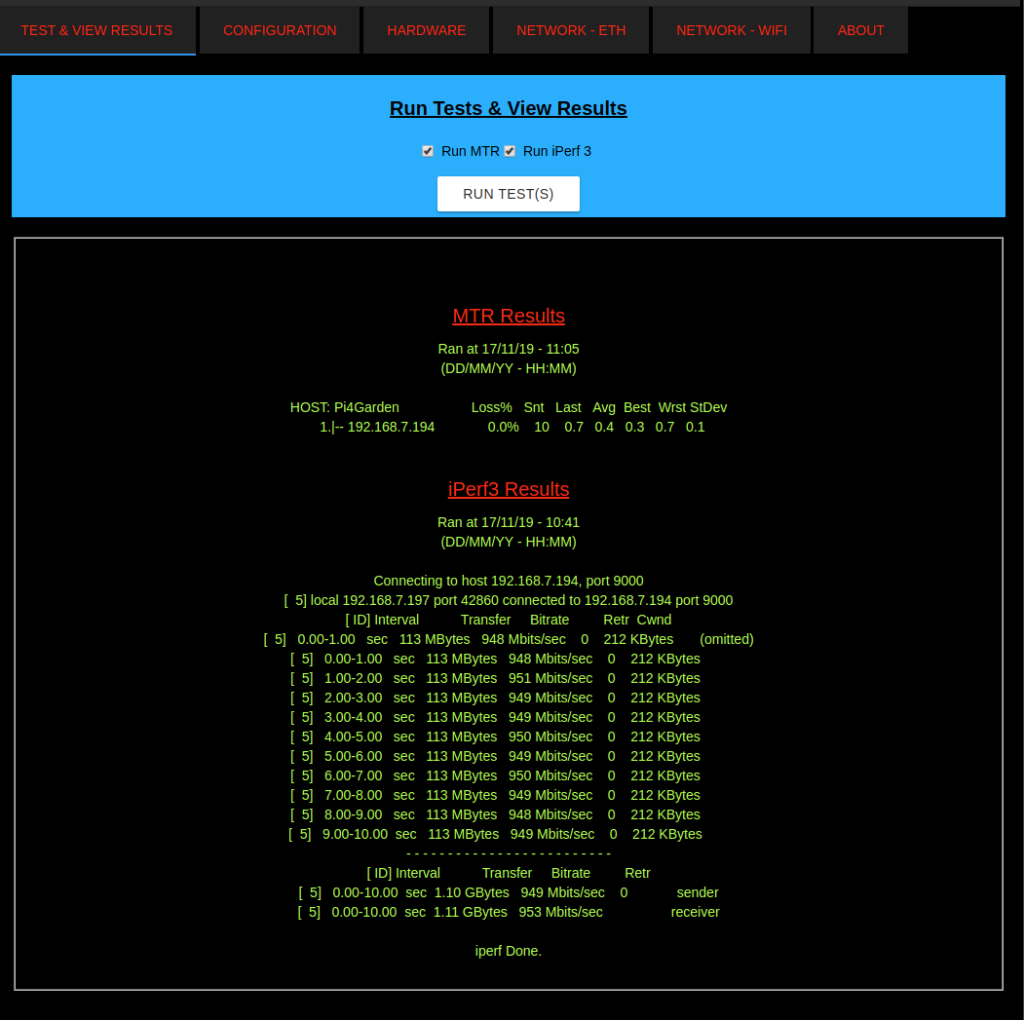
Here’s a picture to illustrate some of the progress on the HTTP portal.

Main page show previously run Tests. Each test was run at a different time.